Saturday, 27 June 2015

Moodle : Incorrect access detected, this server may be accessed only through x address

Often when you install moodle within site directory and when you want to access directly you will see error.


Following amendment can be done to get rid off this error

Change the following file: /home/xxxxxx/public_html/moodle/lib/setuplib.php
Change -  setuplib.php
Redirect ($CFG->wwwroot, get_string('wwwrootmismatch', 'error', $CFG->wwwroot), 3);
for
Redirect ($CFG->wwwroot, get_string('wwwrootmismatch', 'error', $CFG->wwwroot), 0);

Now when you access the link, Moodle redirects immediately to the www.<your registered domain> without the warning message.

Another solution is to make changes in .htaccess file

***************************************************************
suphp_configpath /home/myroot/public_html/php.ini
Options +FollowSymlinks
RewriteEngine on
rewritecond %{http_host} ^www.domainname.com [nc]
rewriterule ^(.*)$ http://domainname.com/$1 [r=301,nc]
 i.e. replace the myhost.com  with your domain name
***************************************************************
The main advantage of this solution, you won't have to update the moodle code every time you update to a new version.

Hope this will solve the issue.

Thursday, 25 June 2015

Some Useful Oracle Tips

Here are some of useful oracle tips that is of common use. Hope you will enjoy this article.

1. You can login to SQL by also typing  scott/tiger together means username/password together need not specify in separate text boxes.
2. Someuseful commands to remind when going to start your oracle engine startup ,shutdown immediate,   shutdown, startup nomount
3. Use command  sqlplus/nolog in anywhere in your command prompt directly to get SQL>
       Like  c:\>sqlplus/nolog you will get SQL>
4. For connected as sys user use command SQL:> conn /as sysdba need not enter semicolon. No error if that is there.
5. For showing the user use show user; command.
6. For creating a new user use command create user user1 identified by password
7. Now connect as  general user use conn as username/password
8. Connect holds create session previleges. So when you log in as a new user it will show error.
9. To remove that give permission of create session to your newly created user.
10. Command is grant create session to username.
11. Now you can login as conn as username/password
12. After connected as general user you have to give resource permission 
13. grant resource to username. That will help to user to create table and other permission


14. Please note down that all the permission can be given as sysdba only so for everytime you have to login as sysdba by using command conn /as sysdba

Ubuntu 14.04 brightness control issue with Intel card

Recently noticed an issue in Dell laptop,It was pre installed with ubuntu 12ish version. Once this was upgraded to ubuntu 14.04 LTS version I noticed there is issue with backlight display and it was not working. Below soultion worked for me hence thought to be useful for others and I am posting here... Steps


[1] Check /usr/share/X11/xorg.conf.d directory and find out if you see file named as “20-intel.conf


oyeweb@oyeweb-Latitude-3540:~$ ls -ltr /usr/share/X11/xorg.conf.d
total 36
-rw-r--r-- 1 root root 842 Feb 5 2014 50-wacom.conf
-rw-r--r-- 1 root root 364 Feb 5 2014 11-evdev-trackpoint.conf
-rw-r--r-- 1 root root 590 Feb 5 2014 11-evdev-quirks.conf
-rw-r--r-- 1 root root 115 Feb 5 2014 50-vmmouse.conf
-rw-r--r-- 1 root root 590 Apr 10 2014 51-synaptics-quirks.conf
-rw-r--r-- 1 root root 1757 Apr 10 2014 50-synaptics.conf
-rw-r--r-- 1 root root 1867 Dec 10 23:47 10-quirks.conf
-rw-r--r-- 1 root root 1099 Dec 10 23:47 10-evdev.conf


[2] If you don't see “20-intel.conf” upi will have to create a file for the same. You can do this as a super user hence follow the command

sudo touch /usr/share/X11/xorg.conf.d/20-intel.conf
[3] Now please edit the file by using vi or any other command
sudo vi /usr/share/X11/xorg.conf.d/20-intel.conf
you will have to add following things into your file
Section
"Device"

    
   Identifier  "card0"

    
   Driver      "intel"

    
   Option      "Backlight"  "intel_backlight"

    
   BusID       "PCI:0:2:0"

EndSection
Please save by using :wq! and restart your laptop/pc. 
I have not remembered if restarts is required but anyhow this solution will work.
Please comment if you see further issues. We will be happy to help.

Wednesday, 24 June 2015

How to restrict Google Translator to translate words


Issue:
Various sites in web are using google translator and sometime developers don't want to translate some words. Explaining a common example where you mention Skype address to contact as below

live:oyeweb

Please see on http://www.oyeweb.com/oye/

Now you will notice if you change language from option (Right side at the Top)

live:oyeweb is not getting translated. This can be done on adding span with class notranslate

<span class="notranslate">

Your other tags go here

</snap>

This can also be checked while using google translator directly. Or click on below link which will land you on google translator with few text. 

Link to check


Now if you have clicked on above, you can see that [bold] is not getting translated via google translator as this is wrapped within span class='notranslate'   as below

Saying hello <span class='notranslate'>[bold]</span> to check


Hope this is clear. Please comment in case of queries.

Sunday, 7 June 2015

SAR value - affects, how to check in your phone

Many people don't care before buying a cellphone. They only check the price and other feature and just spent money.

One more and most important thing is SAR value of a phone which should be seen and keeping in mind that it should be as low as possible.

Here you can read about SAR from wikipedia page (Courtesy wikipedia)

http://en.wikipedia.org/wiki/Specific_absorption_rate

******************************************************************************
Specific absorption rate (SAR) is a measure of the rate at which energy is absorbed by the human body when exposed to a radio frequency (RF) electromagnetic field; although, it can also refer to absorption of other forms of energy by tissue, including ultrasound.[1] It is defined as the power absorbed per mass of tissue and has units ofwatts per kilogram (W/kg).[2]
SAR is usually averaged either over the whole body, or over a small sample volume (typically 1 g or 10 g of tissue). The value cited is then the maximum level measured in the body part studied over the stated volume or mass.
A study of Specific Absorption Rates (SAR) [3][verification needed] lead to a discovery of mobile phone use near human heads and a link to whether the users wear glasses or not. The study concluded that wearing glasses may cause a higher risk of a health hazard to eyes that are exposed to radiation emitted from mobile phones.
******************************************************************************

How to check your phone SAR value

To check SAR value of your phone please dial USSD code *#07#.
if results shows SAR below 1.6 watts per kilogram (1.6 W/kg) then it is OK otherwise you are on high risk and should think about your health.

Also there is a good link to read - Courtesy cancer.gov

http://www.cancer.gov/about-cancer/causes-prevention/risk/radiation/cell-phones-fact-sheet

Hope this will create awareness and you would be more cautious to check SAR values also rather than more focusing on price and other feature because it directly affects your health.


Tuesday, 2 June 2015

Drupal 7 - Unable to send e-mail. Contact the site administrator if the problem persists


In Drupal 7 when you configure a contact form it does not allow you to send mail on external addresses for example if you put email id other than your domain name. It shows a warning message as below

Unable to send e-mail. Contact the site administrator if the problem persists.


Solution of this issue is to configure SMTP settings on your drupal site and that will allow you to send mail.

Listing down the steps that can be used to setting up these. But there is high risk involved for your gmail account. Once you apply these settings you might received mail from google as below

*********************************************************************************

Hi XXXXX,

We recently blocked a sign-in attempt to your Google Account [XXXXX@gmail.com].

Sign-in attempt details
Date & Time: Tuesday, 2 June, 3:07 p.m. GMT
Location: Unknown

If this wasn't you
Please review your Account Activity page at https://security.google.com/settings/security/activity to see if anything looks suspicious. Whoever tried to sign in to your account knows your password; we recommend that you change it right away.

If this was you
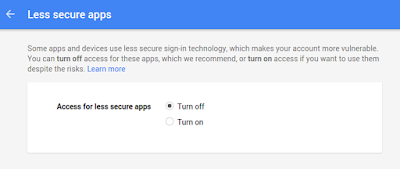
You can switch to an app made by Google such as Gmail to access your account (recommended) or change your settings at https://www.google.com/settings/security/lesssecureapps so that your account is no longer protected by modern security standards.

To learn more, see https://support.google.com/accounts/answer/6010255.

Yours sincerely,
The Google Accounts team

*********************************************************************************

When you click on "If this was you" link https://www.google.com/settings/security/lesssecureapps 
It will land you on page with below information


Hence Please be sure if you want to use SMTP configuration with above risk. 


  1. Please download SMTP authentication module from link as mentioned. Please search with "Drupal SMTP" If you don't see on below link. there could be situation that you read this after a long time - https://www.drupal.org/project/smtp
  2. Now please download this module and enable it. Hope I don't need to explain how to enable modules in drupal. After enabling this module go to Admin > Configuration > SMTP authentication support and set the following values:
  3. Turn on the module at the Install options fieldset at the top.
  4. SMTP server settings:
  5. smtp server: smtp.gmail.com - This would be by default
  6. smtp backup server: leave blank.
  7. smtp port: 465 - This would be by default
  8. use encrypted protocol: select "use SSL"
  9. SMTP authentication:
  10. Enter a valid Gmail email address and password. - Please make sure you have understood risk involves before allowing this.
  11. Email options:
  12. Set the same email address that you used at SMTP Authentication.
  13. Send test email: set an email to receive a sample email.
  14. Enable debugging: yes.

Click on submit and verify that the email was submitted and that you received it. You can enable/disable debugging as per your need so if you want to see output you can keep debugging on. Thats all.
Hope this would be quite useful. Please comment if you still face an issue. We would be happy to help you.

Thanks ---- Happy Learning......!!!